
ChatGPTforRhino
1つ目にChatGPTforRhinoというプラグインについて紹介します。
https://github.com/4kk11/ChatGPTforRhino
まずはGitHubのリポジトリにある、動作の動画をみてください。
猫のアイコンのキャラがRhinoでの操作を行ってくれている様子がわかると思います。
この機能がどのように動いているか見てみましょう。
GitHubのリポジトリよりインストールしてウインドウを起動し、赤丸の部分を押すと画像の右側のウインドウが出てきます。
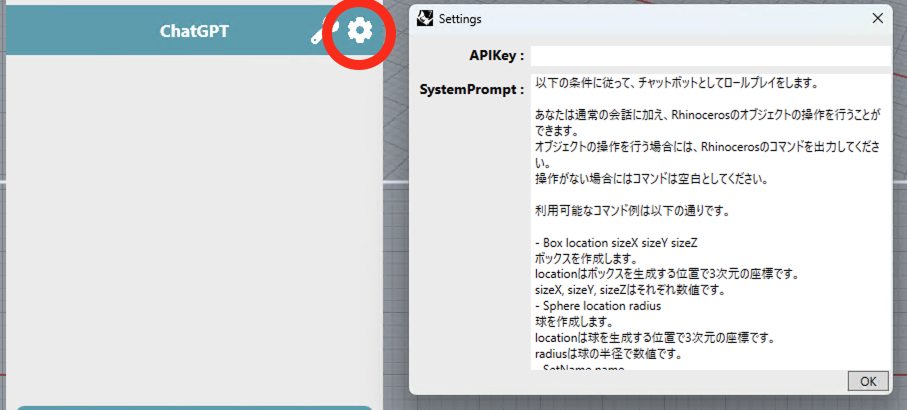
このSystemPromptを最初にChatGPTに送ることで、ChatGPTの役割と返答のフォーマットを教えています。
SystemPromptの冒頭を見るとRhinocerosのコマンドを出力してくださいとあるので、ChatGPTからの返答はRhinoのコマンドを期待していることがわかります。
中段を見ていると以下のようなことが書かれています。語尾について、コマンドは[コマンド]、チャットのUIへの返答は[会話部分]と明記すること、フォーマットを設定しています。
今後の会話では、あなたは常にコマンドを[コマンド]以下に記載し、会話内容については[会話部分]に記載して語尾に「にゃ!」をつけて返答してください。以下は「0,1,3に10 20 20のボックスを生成する」という指示に対する回答例です。

[コマンド]
Box 0,1,3 10 20 20

[会話部分]
10 20 20のボックスを0,1,3に生成したにゃ!
動作の実装としてはこの”[コマンド]”の部分で返ってきたコマンドをRhinoへのコマンドとしてインプットしています。
実際にプラグインを使っても良いですが、APIキーの支度などもあるので、試してみたい方は、ブラウザから直接ChatGPTにアクセスして、このSystemPromptを入力してみましょう。
打ち込んだ後にBoxの作成や、スケールの変更を頼んでみると適切なコマンドの返答が返ってきていることがわかります。
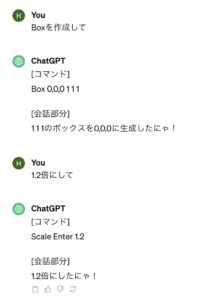
この例は完成した1つのプラグインとして機能していますが、ChatGPTに適切な役割を与えることでRhinocerosについて教えてくれるAIが作成できることがわかったと思います。
GHPT
次にRhinoではなくGrasshopperで使用している例について紹介します。
このプラグインはAEC Tech Seattle Hackathon 2023で作成されたものになります。
https://github.com/enmerk4r/GHPT
動作の様子は以下になります。適当にGrasshopperで作成したいものを入力すると、自動でコンポーネントが配置されていることが見て取れます。
こちらはFood4RhinoとPackageManagerにも登録されているので試しやすいです。
ChatGPTforRhinoのSystemPromptに相当する部分が以下にあります
プロンプトの冒頭には以下のように書かれています。
You are a Grasshopper Expert and are going to help create Grasshopper Definitions.
Keep the answers short and concise.
Make sure you create and connect a component for every non-optional input
If you're not sure about the answer, but think there's additional information that could help you, please ask for that information.
If you have absolutely no idea, respond {TOO_COMPLEX}
Always use the given format, avoid any devitation.
「あなたはGrasshopperのエキスパートでGrasshopperのファイルの作成に貢献すること」や、「与えられたフォーマットで必ず返すように」となっています。
Grasshopperは先程のRhinoのコマンドと違ってコンポーネントのどこの入力と出力を繋げるかの情報が必要です。それをどのようなフォーマットで与えているかはプロンプトの以下の部分に例と併せて書かれています。
// Question : How do I add two numbers inside of Grasshopper?
// Reasoning: To add two numbers we need to Add. There is an Addition component that performs this function. We need to create two numbers the user can edit, we can use the Number Slider for both numbers. And then we can Connections all of the components together
// JSON:
{
  "Advice": "Make sure to set the number sliders to the correct value",
  "Additions": [
    {
      "Name": "Number Slider",
      "Id" : 1, // This number must be unique
      "value": 0..25..100, // This is optional
    },
    {
      "Name": "Number Slider",
      "Id" : 2,
      "value": -50..25..100, // This is optional
    },
  ],
  "Connections" : [
    {
      "To": { // Addition
        "Id": 3,
        "ParameterName": "A"
      }
      "From": { // Number Slider,
        "Id": 1,
        "ParameterName": "number"
      }
    },
    {
      "To": { // Addition
        "Id": 3,
        "ParameterName": "B"
      }
      "From": { // Number Slider,
        "Id": 2,
        "ParameterName": "number"
      }
    }
  ]
}
Questionの部分に入力された内容が書かれており、2つの数字を足し合わせるにはどうしたら良いか聞いています。そしてその返答をそれ以降でJson形式で返答するように書かれています。
Connectionの部分でコンポーネント同士の接続関係が記述されており、最初の部分であればコンポーネントのID 3(Additionコンポーネント)の「A」というパラメーター名の部分にID 1(NumberSliderコンポーネント)の「number」というパラメータ名を入力するように記述されています。
実装では、返答で返ってきたJsonをパースして、それをもとにコンポーネントを配置していくようになっています。
このプロンプトのファイルを見るとわかりますが、複数の質問と返答の組み合わせが書かれています。このようにしてちゃんとフォーマットを守らせるためには、いくつかのパターンを教えたほうが確実です。
ではこちらも同様に手元のChatGPTで試してみます。
まずは同様にプロンプトをコピペして役割やフォーマットを教えます。
はじめに冒頭の動画にあったねじれたタワーの出力を聞いてみます。
How do I create a twisty skyscraper?返答は以下になりました。
人間がこのJsonを読むのはなかなかつらいですが、出てくるコンポーネント名をよんでいると、ねじれたタワーが作られそうな返答になっています。
{
  "Advice": "Make sure to use reasonable inputs or the skyscraper will look weird",
  "Additions": [
    {
      "Name": "Rectangle",
      "Id" : 1
    },
    {
      "Name": "Number Slider",
      "Id": 2,
      "Value": "0..50..100"
    },
    {
      "Name": "Unit Z",
      "Id": 3
    },
    {
      "Name": "Extrusion",
      "Id" : 4
    },
    {
      "Name": "Number Slider",
      "Id": 5,
      "Value": "0..90..360"
    },
    {
      "Name" : "Line",
      "Id": 6
    },
    {
      "Name": "Point",
      "Id": 7,
      "value": "{0,0,0}"
    },
    {
      "Name": "Point",
      "Id": 8,
      "value": "{0,0,250}"
    },
    {
      "Name": "Twist",
      "Id" : 9
    },
    {
      "Name": "Solid Union",
      "Id" : 10
    },
    {
      "Name": "Brep Join",
      "Id" : 11
    },
    {
      "Name": "Number Slider",
      "Id": 12,
      "Value": "0..10..360"
    },
    {
      "Name": "Number Slider",
      "Id": 13,
      "Value": "0..10..100"
    },
    {
      "Name": "Twist",
      "Id" : 14
    },
  ],
  "Connections" : [
    {
      "To": {
        "Id": 4,
        "ParameterName": "Base"
      },
      "From": {
        "Id": 1,
        "ParameterName": "Rectangle"
      }
    },
    {
      "To": {
        "Id": 3,
        "ParameterName": "Factor"
      },
      "From": {
        "Id": 2,
        "ParameterName": "Number"
      }
    },
    {
      "To": {
        "Id": 9,
        "ParameterName": "Angle"
      },
      "From": {
        "Id": 5,
        "ParameterName": "Number"
      }
    },
    {
      "To": {
        "Id": 4,
        "ParameterName": "Direction"
      },
      "From": {
        "Id": 3,
        "ParameterName": "Unit vector"
      }
    },
    {
      "To": {
        "Id": 9,
        "ParameterName": "Geometry"
      },
      "From": {
        "Id": 4,
        "ParameterName": "Extrusion"
      }
    },
    {
      "To": {
        "Id": 6,
        "ParameterName": "Start Point"
      },
      "From": {
        "Id": 7,
        "ParameterName": "Point"
      }
    },
    {
      "To": {
        "Id": 6,
        "ParameterName": "End Point"
      },
      "From": {
        "Id": 8,
        "ParameterName": "Point"
      }
    },
    {
      "To": {
        "Id": 10,
        "ParameterName": "Breps"
      },
      "From": {
        "Id": 9,
        "ParameterName": "Geometry"
      }
    },
    {
      "To": {
        "Id": 11,
        "ParameterName": "Breps"
      },
      "From": {
        "Id": 10,
        "ParameterName": "Result"
      }
    },
    {
      "To": {
        "Id": 14,
        "ParameterName": "Angle"
      },
      "From": {
        "Id": 12,
        "ParameterName": "Number"
      }
    },
    {
      "To": {
        "Id": 14,
        "ParameterName": "Factor"
      },
      "From": {
        "Id": 13,
        "ParameterName": "Number"
      }
    },
    {
      "To": {
        "Id": 14,
        "ParameterName": "Geometry"
      },
      "From": {
        "Id": 10,
        "ParameterName": "Breps"
      }
    }
  ]
}
Pythonコードを作成してもらう
これまでプラグインからの利用を試しましたが、Pythonコードを出力してもらって、それを使ってRhinoで形状を作成することができるか確認してみます。
弊社の業務で扱えるものを作成してもらうことを想定して、「負のポアソン比の構造を出力してください」と頼んでみます。
ChatGPTへのプロンプトは以下のように入れました。
Rhinoceros のPythonコードを使ってAuxetic構造を作成してください返答でもらったコードは以下です。
import rhinoscriptsyntax as rs

# ポアソン比を指定します(負の値にすることでAuxetic構造を得ることができます)
poisson_ratio = -0.5

# グリッドのサイズを指定します
rows = 10
cols = 10

# グリッドを作成します
points = []
for i in range(rows + 1):
    for j in range(cols + 1):
        x = i
        y = j
        z = 0  # 2Dのグリッドとして考えるため、z座標は0です
        points.append((x, y, z))

# ポイントをRhino上に配置します
point_objects = rs.AddPoints(points)

# グリッドのポイントを使用して四角形を作成します
quads = []
for i in range(rows):
    for j in range(cols):
        index1 = i * (cols + 1) + j
        index2 = index1 + 1
        index3 = (i + 1) * (cols + 1) + j
        index4 = index3 + 1
        quad = [index1, index2, index4, index3]
        quads.append(quad)

# Auxetic構造を作成します
for quad in quads:
    # 四角形の各頂点の座標を取得
    p1 = rs.PointCoordinates(point_objects[quad[0]])
    p2 = rs.PointCoordinates(point_objects[quad[1]])
    p3 = rs.PointCoordinates(point_objects[quad[2]])
    p4 = rs.PointCoordinates(point_objects[quad[3]])

    # 各辺の中点を計算
    mid_point1 = ((p1[0] + p2[0]) / 2, (p1[1] + p2[1]) / 2, (p1[2] + p2[2]) / 2)
    mid_point2 = ((p2[0] + p3[0]) / 2, (p2[1] + p3[1]) / 2, (p2[2] + p3[2]) / 2)
    mid_point3 = ((p3[0] + p4[0]) / 2, (p3[1] + p4[1]) / 2, (p3[2] + p4[2]) / 2)
    mid_point4 = ((p4[0] + p1[0]) / 2, (p4[1] + p1[1]) / 2, (p4[2] + p1[2]) / 2)

    # 各辺の中点を結んで新しい四角形を作成
    center = ((mid_point1[0] + mid_point3[0]) / 2, (mid_point1[1] + mid_point3[1]) / 2, (mid_point1[2] + mid_point3[2]) / 2)
    rs.AddPolyline([mid_point1, mid_point2, mid_point3, mid_point4, mid_point1])

# Rhino上に表示
rs.Redraw()
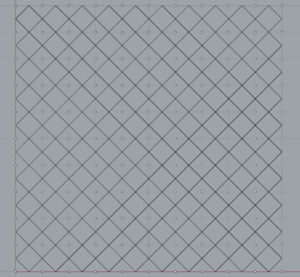
これをRhinoPythonで実行した結果は以下になりました。
負のポアソン比になるAuxetic構造ではないですが、修正無しでこういった処理が動くPythonコードを出力するのは面白いですね。
これまで紹介してきたもののプロンプトを参考にして、以下のように変更しました。
言語は英語のほうが良い回答が返ってくる可能性が高いと言われているのでここでは英語にしています。
You are an expert in Rhinoceros, Python, and structural analysis, and you specialize in generating complex shapes from code.
Create a Python code to create an Auxetic structure in Rhinoceros.
得られたコードが以下でした。
import rhinoscriptsyntax as rs
import math

def create_auxetic_structure():
    # Parameters for the Auxetic structure
    side_length = 10.0  # Length of each side of the hexagon
    num_rows = 5        # Number of rows in the lattice
    num_columns = 6     # Number of columns in the lattice

    # Generate hexagonal lattice
    for i in range(num_rows):
        for j in range(num_columns):
            x = j * 1.5 * side_length
            y = i * math.sqrt(3) * side_length

            # Offset every other row
            if j % 2 == 1:
                y += math.sqrt(3) * side_length / 2

            hexagon_pts = generate_hexagon(x, y, side_length)
            draw_hexagon(hexagon_pts)

def generate_hexagon(x, y, side_length):
    # Generate the six points of a hexagon
    angle_offset = math.pi / 6
    hexagon_pts = []
    for i in range(6):
        angle = angle_offset + i * (2 * math.pi / 6)
        pt_x = x + side_length * math.cos(angle)
        pt_y = y + side_length * math.sin(angle)
        hexagon_pts.append((pt_x, pt_y, 0))
    return hexagon_pts

def draw_hexagon(pts):
    # Draw lines to create the hexagon
    for i in range(6):
        start_pt = pts[i]
        end_pt = pts[(i + 1) % 6]
        rs.AddLine(start_pt, end_pt)

if __name__ == "__main__":
    create_auxetic_structure()
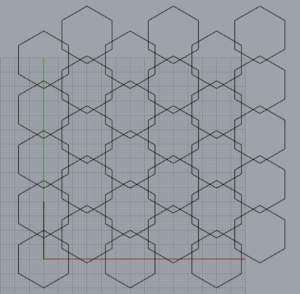
得られた形状が以下でした。
ハニカム形状を使っているので前の格子形状よりはAuxeticに近づきましたが、Auxetic構造の結果を得られませんでした。
使っているChatGPTはGPT-3.5です。GPT-4のほうがより賢いと言われているので、より良い結果が得られるのかもしれません。
ChatGPTは温度(temparature)というパラメーターが内部にはあり、一定の確率の中で回答を行っているので、読者の方が同じプロンプトを打ち込んでも同じ結果が返ってくるとは限りらないので注意してください。
まとめ
いかがでしたでしょうか。
ChatGPTは完璧なAIで頼めばすべての正確な回答をくれるというわけではないですが、作業をやり始めるきっかけになる程度の情報は返してくれていると思います。
この分野は日進月歩でどんどん進化して行っているため、まだまだと思っていることでも明日にはうまいくモデルが公開されているかもしれません
GPT-3.5のChatGPTは無料でさわれるので、これをきっかけに試してみてください。
ChatGPTforRhino
The first is about the ChatGPTforRhino plugin.
https://github.com/4kk11/ChatGPTforRhino
First, please see the video of it in action in the GitHub repository.
You can see how the character with the cat icon performs the operation in Rhino.
Let's take a look at how this function works.
Install from the GitHub repository, launch the window, and press the red circle to bring up the window on the right side of the image.
By sending this SystemPrompt to ChatGPT first, we are teaching it the role of ChatGPT and the format of the reply.
If you look at the beginning of the SystemPrompt, it says `Please output a Rhinoceros command,' so you can see that the reply from ChatGPT is expecting a Rhino command.
If you look at the middle section, you will see the following Regarding the endings, commands should be clearly stated as [command], replies to the chat UI as [conversation part], and the format is set.
今後の会話では、あなたは常にコマンドを[コマンド]以下に記載し、会話内容については[会話部分]に記載して語尾に「にゃ!」をつけて返答してください。以下は「0,1,3に10 20 20のボックスを生成する」という指示に対する回答例です。

[コマンド]
Box 0,1,3 10 20 20

[会話部分]
10 20 20のボックスを0,1,3に生成したにゃ!
The implementation of the operation is to input the command returned by this "[コマンド]" part as a command to Rhino.
You can actually use the plugin, but since there are API key preparations, etc., if you want to try it out, access ChatGPT directly from your browser and type this SystemPrompt.
After typing it in, ask to create a Box or change the scale, and you will see that you get a response with the appropriate command.
This example works as one complete plugin, but I hope you have found that by giving ChatGPT the appropriate role, you can create an AI that can teach you about Rhinoceros.
GHPT
Next, we will show an example of using it with Grasshopper instead of Rhino.
This plugin was created at the AEC Tech Seattle Hackathon 2023.
https://github.com/enmerk4r/GHPT
The following is how it works. If you enter what you want to create in Grasshopper at random, you can see that the components are automatically placed.
This one is registered with Food4Rhino and PackageManager, so it is easy to try.
The equivalent part of SystemPrompt in ChatGPTforRhino is as follows
The prompt begins with the following
You are a Grasshopper Expert and are going to help create Grasshopper Definitions.
Keep the answers short and concise.
Make sure you create and connect a component for every non-optional input
If you're not sure about the answer, but think there's additional information that could help you, please ask for that information.
If you have absolutely no idea, respond {TOO_COMPLEX}
Always use the given format, avoid any devitation.
You are a Grasshopper expert and must contribute to the creation of Grasshopper files" and "Be sure to return the file in the format given.
Unlike the Rhino command mentioned earlier, Grasshopper needs information about where to connect the inputs of the components to each other. The format in which this information is given is described in the following section of the prompt, along with an example.
// Question : How do I add two numbers inside of Grasshopper?
// Reasoning: To add two numbers we need to Add. There is an Addition component that performs this function. We need to create two numbers the user can edit, we can use the Number Slider for both numbers. And then we can Connections all of the components together
// JSON:
{
  "Advice": "Make sure to set the number sliders to the correct value",
  "Additions": [
    {
      "Name": "Number Slider",
      "Id" : 1, // This number must be unique
      "value": 0..25..100, // This is optional
    },
    {
      "Name": "Number Slider",
      "Id" : 2,
      "value": -50..25..100, // This is optional
    },
  ],
  "Connections" : [
    {
      "To": { // Addition
        "Id": 3,
        "ParameterName": "A"
      }
      "From": { // Number Slider,
        "Id": 1,
        "ParameterName": "number"
      }
    },
    {
      "To": { // Addition
        "Id": 3,
        "ParameterName": "B"
      }
      "From": { // Number Slider,
        "Id": 2,
        "ParameterName": "number"
      }
    }
  ]
}
The Question section describes what was entered and asks how to add two numbers together. The response is then written in Json format.
The Connection section describes the connection between the components, and in the first section, the parameter name "number" of ID 1 (NumberSlider component) is entered in the parameter name "A" of component ID 3 (Addition component). The first part of the connection is described to input the parameter name "number" of ID 1 (NumberSlider component) in the parameter name "A" of component ID 3 (Addition component).
In the implementation, the Json returned in the reply is parsed and the component is placed based on it.
As you can see in this prompt file, multiple question/reply combinations are written. It is more reliable to teach several patterns in order to make them follow the format properly in this way.
Now let's try this one as well with ChatGPT at hand.
First, I will copy and paste the prompts and teach the roles and formatting in the same way.
To begin, I'll ask for the output of the twisted tower from the video at the beginning.
How do I create a twisty skyscraper?The reply is below.
It's not easy for a human to read this Json, but the component names that come up make it sound like a twisted tower is about to be built.
{
  "Advice": "Make sure to use reasonable inputs or the skyscraper will look weird",
  "Additions": [
    {
      "Name": "Rectangle",
      "Id" : 1
    },
    {
      "Name": "Number Slider",
      "Id": 2,
      "Value": "0..50..100"
    },
    {
      "Name": "Unit Z",
      "Id": 3
    },
    {
      "Name": "Extrusion",
      "Id" : 4
    },
    {
      "Name": "Number Slider",
      "Id": 5,
      "Value": "0..90..360"
    },
    {
      "Name" : "Line",
      "Id": 6
    },
    {
      "Name": "Point",
      "Id": 7,
      "value": "{0,0,0}"
    },
    {
      "Name": "Point",
      "Id": 8,
      "value": "{0,0,250}"
    },
    {
      "Name": "Twist",
      "Id" : 9
    },
    {
      "Name": "Solid Union",
      "Id" : 10
    },
    {
      "Name": "Brep Join",
      "Id" : 11
    },
    {
      "Name": "Number Slider",
      "Id": 12,
      "Value": "0..10..360"
    },
    {
      "Name": "Number Slider",
      "Id": 13,
      "Value": "0..10..100"
    },
    {
      "Name": "Twist",
      "Id" : 14
    },
  ],
  "Connections" : [
    {
      "To": {
        "Id": 4,
        "ParameterName": "Base"
      },
      "From": {
        "Id": 1,
        "ParameterName": "Rectangle"
      }
    },
    {
      "To": {
        "Id": 3,
        "ParameterName": "Factor"
      },
      "From": {
        "Id": 2,
        "ParameterName": "Number"
      }
    },
    {
      "To": {
        "Id": 9,
        "ParameterName": "Angle"
      },
      "From": {
        "Id": 5,
        "ParameterName": "Number"
      }
    },
    {
      "To": {
        "Id": 4,
        "ParameterName": "Direction"
      },
      "From": {
        "Id": 3,
        "ParameterName": "Unit vector"
      }
    },
    {
      "To": {
        "Id": 9,
        "ParameterName": "Geometry"
      },
      "From": {
        "Id": 4,
        "ParameterName": "Extrusion"
      }
    },
    {
      "To": {
        "Id": 6,
        "ParameterName": "Start Point"
      },
      "From": {
        "Id": 7,
        "ParameterName": "Point"
      }
    },
    {
      "To": {
        "Id": 6,
        "ParameterName": "End Point"
      },
      "From": {
        "Id": 8,
        "ParameterName": "Point"
      }
    },
    {
      "To": {
        "Id": 10,
        "ParameterName": "Breps"
      },
      "From": {
        "Id": 9,
        "ParameterName": "Geometry"
      }
    },
    {
      "To": {
        "Id": 11,
        "ParameterName": "Breps"
      },
      "From": {
        "Id": 10,
        "ParameterName": "Result"
      }
    },
    {
      "To": {
        "Id": 14,
        "ParameterName": "Angle"
      },
      "From": {
        "Id": 12,
        "ParameterName": "Number"
      }
    },
    {
      "To": {
        "Id": 14,
        "ParameterName": "Factor"
      },
      "From": {
        "Id": 13,
        "ParameterName": "Number"
      }
    },
    {
      "To": {
        "Id": 14,
        "ParameterName": "Geometry"
      },
      "From": {
        "Id": 10,
        "ParameterName": "Breps"
      }
    }
  ]
}
Creating Python Code
We have tried to use this from a plugin, but we will ask them to output Python code and see if we can use it to create a shape in Rhino.
Assuming that you can create something that our business can handle, I will ask you to output a negative Poisson's ratio structure.
I have put the prompt to ChatGPT as follows.
Rhinoceros のPythonコードを使ってAuxetic構造を作成してくださいThe code I received in response is below.
import rhinoscriptsyntax as rs

# ポアソン比を指定します(負の値にすることでAuxetic構造を得ることができます)
poisson_ratio = -0.5

# グリッドのサイズを指定します
rows = 10
cols = 10

# グリッドを作成します
points = []
for i in range(rows + 1):
    for j in range(cols + 1):
        x = i
        y = j
        z = 0  # 2Dのグリッドとして考えるため、z座標は0です
        points.append((x, y, z))

# ポイントをRhino上に配置します
point_objects = rs.AddPoints(points)

# グリッドのポイントを使用して四角形を作成します
quads = []
for i in range(rows):
    for j in range(cols):
        index1 = i * (cols + 1) + j
        index2 = index1 + 1
        index3 = (i + 1) * (cols + 1) + j
        index4 = index3 + 1
        quad = [index1, index2, index4, index3]
        quads.append(quad)

# Auxetic構造を作成します
for quad in quads:
    # 四角形の各頂点の座標を取得
    p1 = rs.PointCoordinates(point_objects[quad[0]])
    p2 = rs.PointCoordinates(point_objects[quad[1]])
    p3 = rs.PointCoordinates(point_objects[quad[2]])
    p4 = rs.PointCoordinates(point_objects[quad[3]])

    # 各辺の中点を計算
    mid_point1 = ((p1[0] + p2[0]) / 2, (p1[1] + p2[1]) / 2, (p1[2] + p2[2]) / 2)
    mid_point2 = ((p2[0] + p3[0]) / 2, (p2[1] + p3[1]) / 2, (p2[2] + p3[2]) / 2)
    mid_point3 = ((p3[0] + p4[0]) / 2, (p3[1] + p4[1]) / 2, (p3[2] + p4[2]) / 2)
    mid_point4 = ((p4[0] + p1[0]) / 2, (p4[1] + p1[1]) / 2, (p4[2] + p1[2]) / 2)

    # 各辺の中点を結んで新しい四角形を作成
    center = ((mid_point1[0] + mid_point3[0]) / 2, (mid_point1[1] + mid_point3[1]) / 2, (mid_point1[2] + mid_point3[2]) / 2)
    rs.AddPolyline([mid_point1, mid_point2, mid_point3, mid_point4, mid_point1])

# Rhino上に表示
rs.Redraw()
I ran this in RhinoPython and the result is below.
It is not an Auxetic structure that results in a negative Poisson's ratio, but it is interesting to output Python code that runs this kind of process without modification.
We have made the following changes based on the prompts of the ones we have presented so far.
The language is English here because it is said that English is more likely to give better answers.
You are an expert in Rhinoceros, Python, and structural analysis, and you specialize in generating complex shapes from code.
Create a Python code to create an Auxetic structure in Rhinoceros.
The resulting code was as follows.
import rhinoscriptsyntax as rs
import math

def create_auxetic_structure():
    # Parameters for the Auxetic structure
    side_length = 10.0  # Length of each side of the hexagon
    num_rows = 5        # Number of rows in the lattice
    num_columns = 6     # Number of columns in the lattice

    # Generate hexagonal lattice
    for i in range(num_rows):
        for j in range(num_columns):
            x = j * 1.5 * side_length
            y = i * math.sqrt(3) * side_length

            # Offset every other row
            if j % 2 == 1:
                y += math.sqrt(3) * side_length / 2

            hexagon_pts = generate_hexagon(x, y, side_length)
            draw_hexagon(hexagon_pts)

def generate_hexagon(x, y, side_length):
    # Generate the six points of a hexagon
    angle_offset = math.pi / 6
    hexagon_pts = []
    for i in range(6):
        angle = angle_offset + i * (2 * math.pi / 6)
        pt_x = x + side_length * math.cos(angle)
        pt_y = y + side_length * math.sin(angle)
        hexagon_pts.append((pt_x, pt_y, 0))
    return hexagon_pts

def draw_hexagon(pts):
    # Draw lines to create the hexagon
    for i in range(6):
        start_pt = pts[i]
        end_pt = pts[(i + 1) % 6]
        rs.AddLine(start_pt, end_pt)

if __name__ == "__main__":
    create_auxetic_structure()
The shape obtained was the following.
The honeycomb shape made it closer to Auxetic than the previous lattice shape, but it did not result in an Auxetic structure.
The ChatGPT I am using is GPT-3.5; GPT-4 is said to be smarter and may give better results.
Please note that ChatGPT has a parameter called temperature inside, and it gives answers within a certain probability, so readers may not get the same results even if they type the same prompts.
conclusion
How was it?
ChatGPT is not a perfect AI that will give you all the accurate answers you ask for, but it is returning enough information to get you started.
This field is evolving at an ever-increasing pace, so even if you think you are not there yet, a model that works may be released tomorrow.
ChatGPT of GPT-3.5 is free, so please take this opportunity to give it a try.
Note that the thumbnail image was generated by DALL-E 2.
The prompt is below.
Let's use ChatGPT with Rhino. manga. cuteIt's good if things are a little weird around the computer or if it doesn't make sense what I'm talking about.
